What are the modern techniques which allow the turning of a unique original illuminated manuscript into a perfect facsimile? How can a faithful to the original copy be achieved, from the use of colors to the application of gold and silver shades?
How is a Facsimile Edition Made?
Today’s post deals with the description of the individual steps involved in faithfully reproducing a unique original with the present technique.
Image data
It all begins with capturing an exact image of each page of a manuscript. Until just a few years ago, this was best done on the book removed from its binding and disassembled; today it suffices to open the volume by just over 90 degrees. Opening the book in this manner ensures that the manuscript page can be shot without image loss, even when text and decoration extend quite near the gutter (the middle between two facing pages).
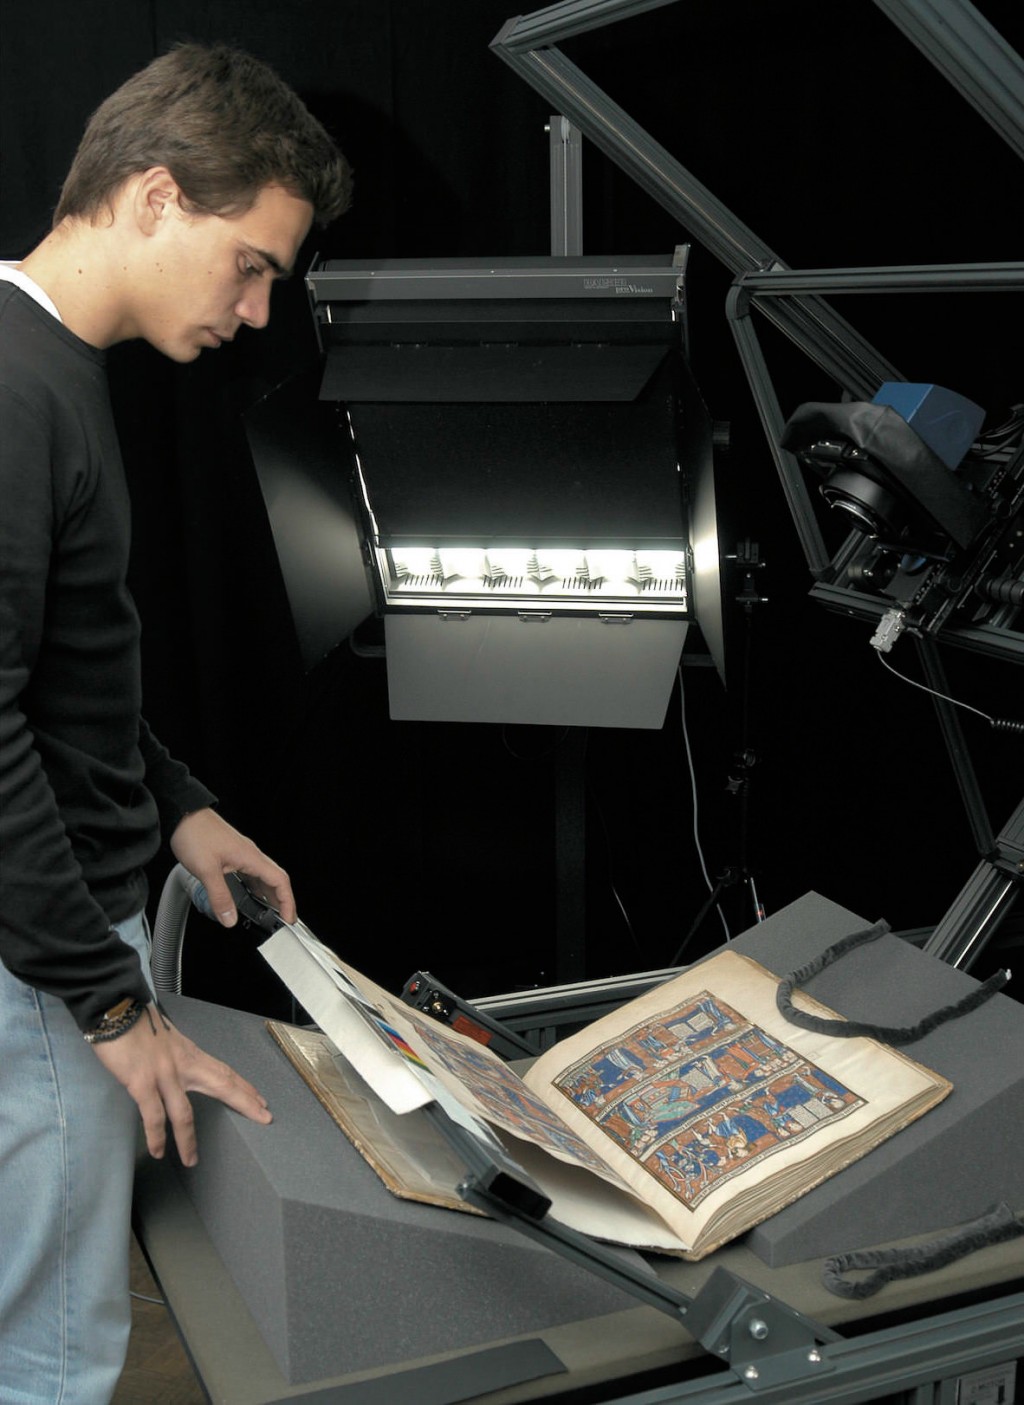
After years of work, the restoration department of the manuscript collection at the Universitätsbibliothek Graz developed a camera table for digitizing sensitive book material, which not only is used in the world’s libraries but has also revolutionized the imaging technique for facsimile editions. Faksimile Verlag helped substantially in fostering this development for its own purposes.
It is now possible to photograph with extreme care even the most valuable illuminated manuscripts, that couldn’t possibly have a facsimile until now for conservational reasons.
While image capture was carried out with classic – analog – photography until the end of the 1990s, digital imaging technology has triumphed since then to a level unimaginable just a few years ago. The advantage of digital image data capture lies in the significantly higher amount of “information” about each individual page than was provided by diapositives. Furthermore, it means that a lesser number of color comparisons, than with analog image data, needs to be done on the original. Anyone who knows how important it is to reduce the handling of thousand-year-old manuscripts to a minimum will appreciate this as an especially important advance.
Color separations
As soon as the image data have been captured, in whatever form, they will be analyzed by applying the principles of color theory. The three primary colors of the spectrum are read (scanned) from the image data and changed into the four printing colors (cyan, magenta, yellow and black, in printer language). These data are then processed on screen by a trained lithographer.
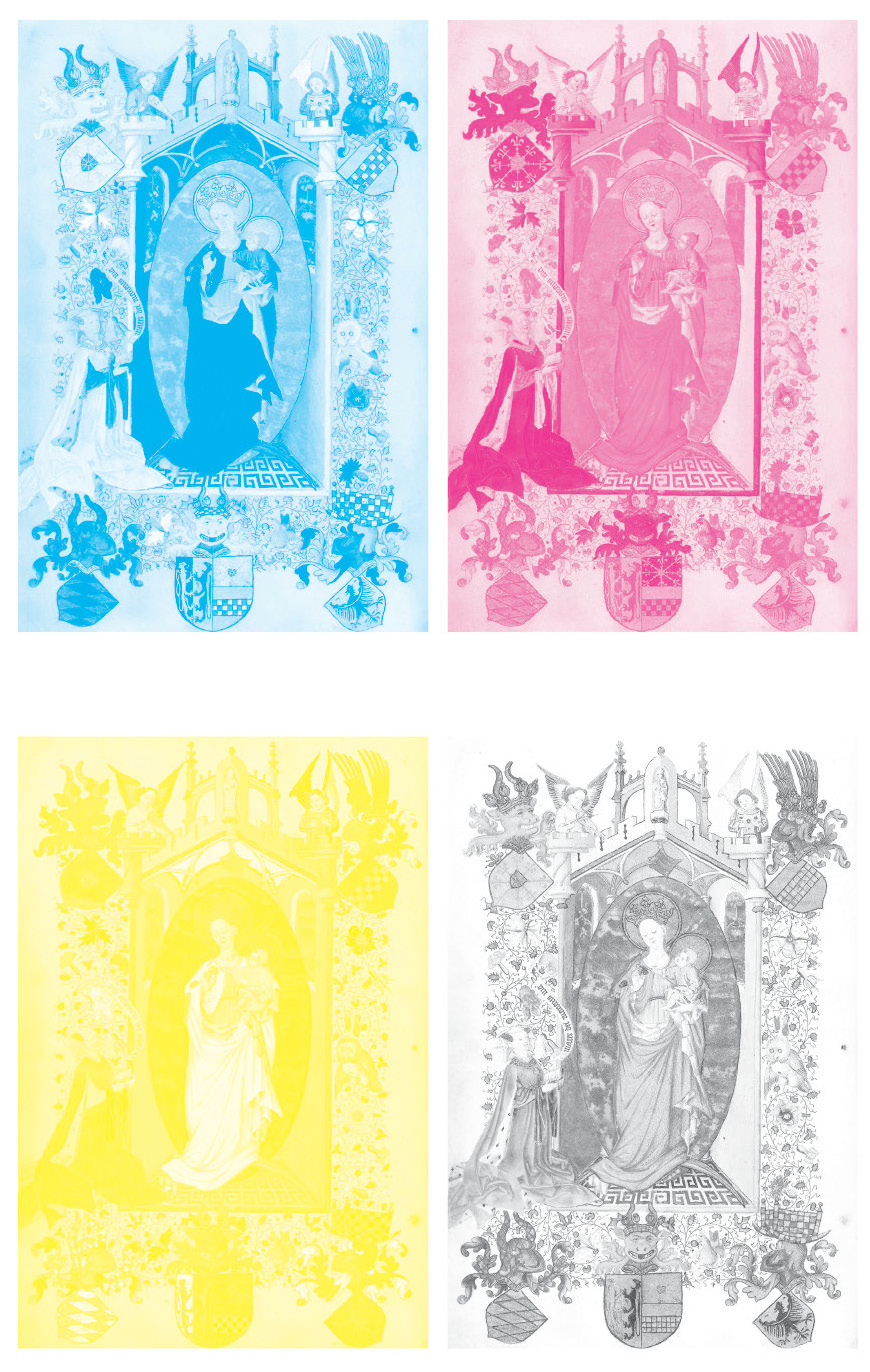
Since even the most precise image data capture does not always register the original’s colors exactly, a skilled specialist must manually correct them – formerly this was done on film, today it is done on the computer. An offset plate is then exposed to these modified image data, fixing them on the plate in the manuscript original’s format.
Printing
In the actual printing process, the exposed areas on the offset plate accept the individual printing colors, only to transfer them indirectly via a special rubber mat onto the paper. The color uptake and release take place through minute dots that neither the naked eye nor most magnifiers can detect.
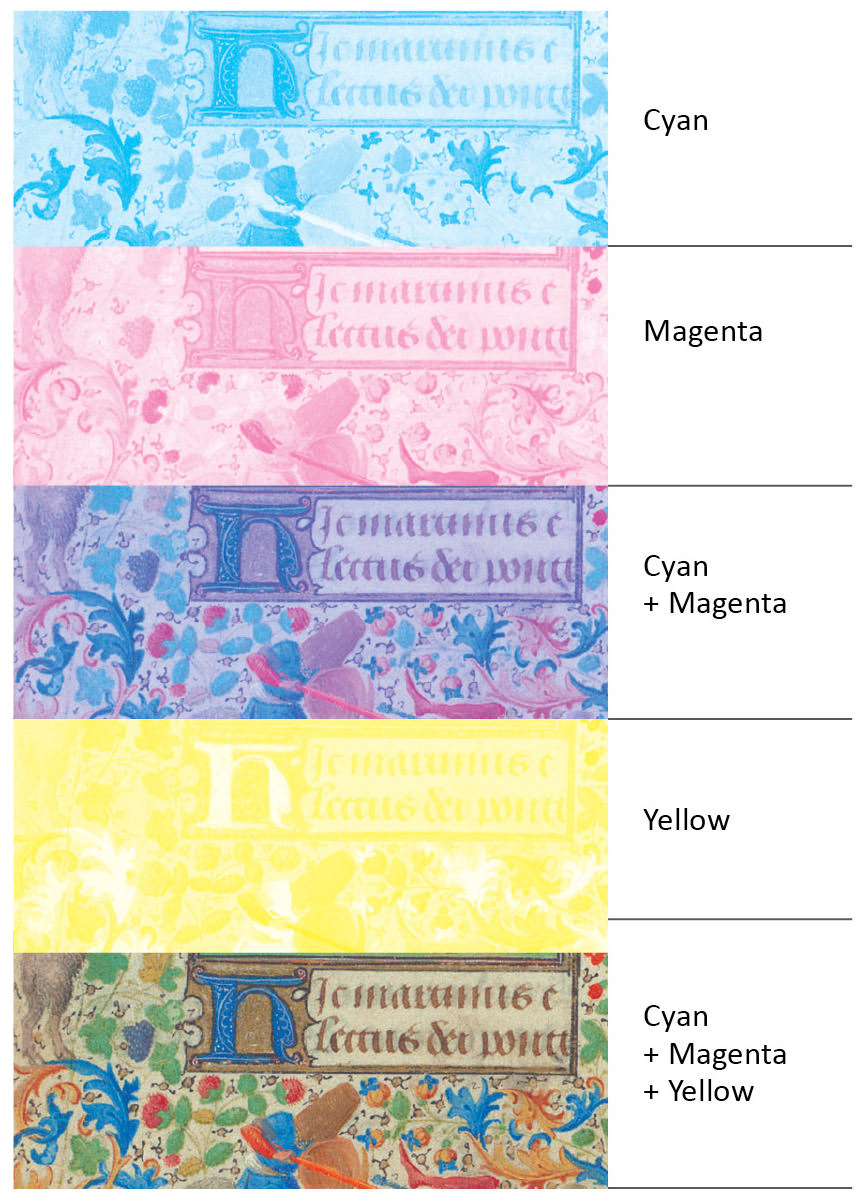
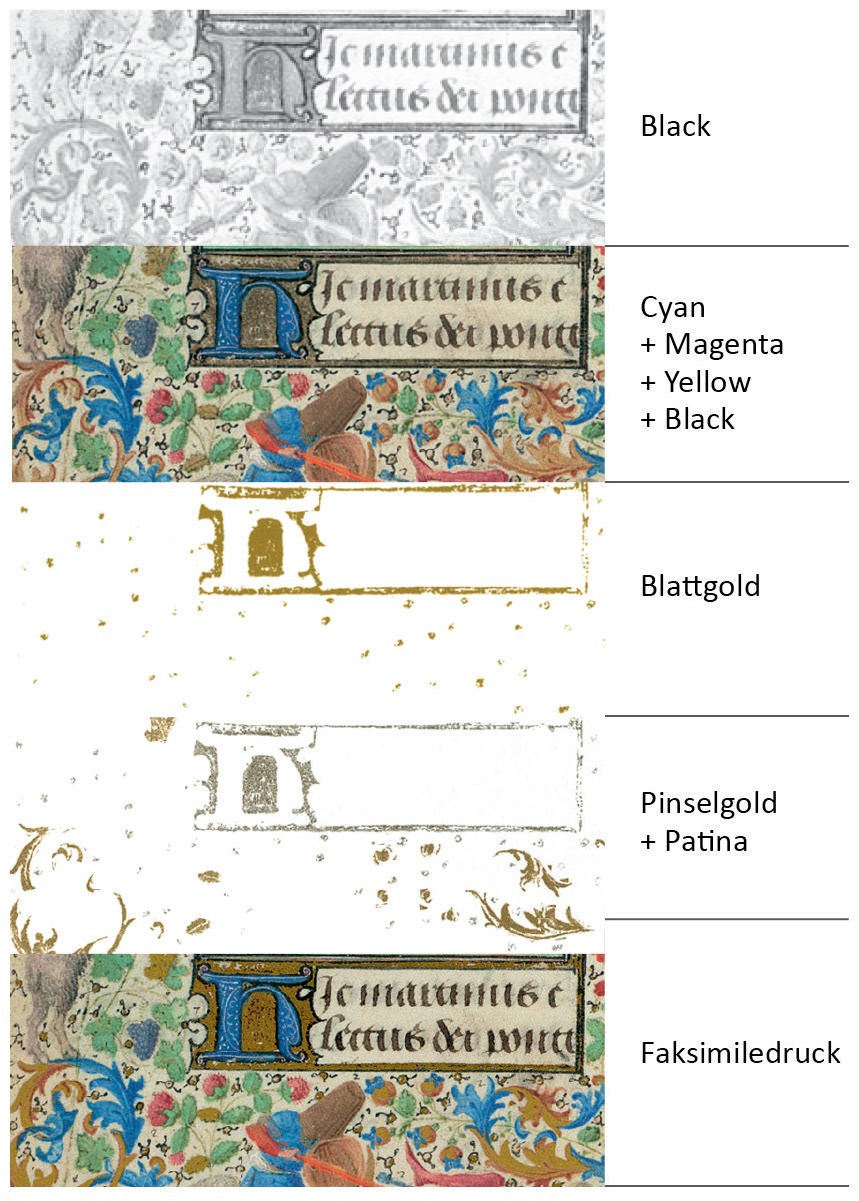
Nevertheless, the colors used during the Middle Ages cannot be reproduced with modern printing colors in every instance, often because neither analog nor digital can discern them correctly. For this reason, special colors have to be used for certain tones like red lead, turquoise or specific shades of blue, that is, individually matched color hues are printed over the four standard colors. In order to recreate the brilliance of some of the original’s hues, occasionally even metal pigments are added to the print colors.
Comparison with the original
Printing many proofs on the same machine that will be used to print the edition is required, so that the facsimile can ultimately stand comparison with the original. Individual pages are printed repeatedly and compared to the original. Taking into account that the originals may not leave the libraries for these comparisons, and that these libraries in turn are scattered all over the globe (Munich, Brussels, New York, London, Los Angeles or Alba Julia/Rumania, just to name a few places), gives an idea of the amount of effort that must be expended at this stage.
To be sure that the facsimile can stand comparison with the original, it is necessary to print many proofs on the same machine that will be used to print the edition.
Not until the colors, after many adjustments, are identical with the illuminated manuscript’s original will the edition be printed under constant quality control.
Gold and silver
A phenomenon that even today in large measure still eludes technical realization is the metallic gold and silver colors, which give these magnificent manuscripts their great charm and often have considerable importance for the content. Both analog and digital image data capture registers them only as part of the color spectrum: gold, depending on its reflectivity, from yellow through green and brown to black; silver, from white through blue to yellow, provided oxidation has not yet robbed it of its metallic character.
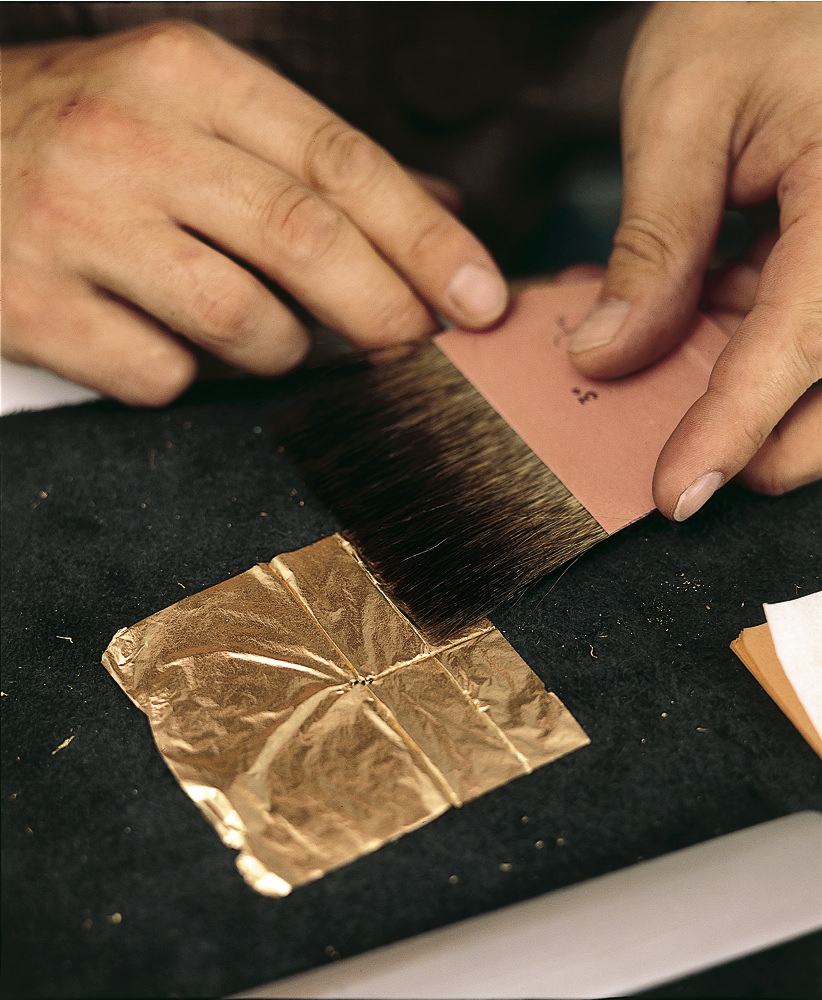
In order to create forms for gilding the individual manuscript pages, all metallic colors have to be traced and reworked on the computer screen in what resembles meticulous monastic copying work. The reader of these lines needs not to be told what this entails for a codex aureus, a manuscript written entirely in gold, such as the Lorsch Gospels, the Codex Aureus of Echternach, the Gospels of John of Opava or even the little Prayerbook of Otto III.
Conclusions
Making a facsimile is not easy and there are many rules that have to be observed in order to get it right. Those presented in this post are not the only important features that make of a printed book a real facsimile, and we will be glad to present the others to you next time. Be sure not to miss this opportunity!
Coming Next..
- The Story of Faksimile Verlag, Publisher of Fine Facsimile Editions – part 1
- Facsimiles and the Role of Illuminated Manuscripts: the Story of Faksimile Verlag – part 2
- What is a Facsimile: the Story of Faksimile Verlag – part 3
- How it All Began: the Story of Faksimile Verlag – part 4
- From Analog to Digital: the Story of Faksimile Verlag – part 5
- The Making Process of a Facsimile: the Story of Faksimile Verlag – part 6
- Challenges and Magic of Facsimile Production: the Story of Faksimile Verlag – part 7
- Binding, Paper, and Commentary: the Story of Faksimile Verlag – part 8
- Treasures of the Past: the Story of Faksimile Verlag – part 9
- Gems of the Middle Ages: the Story of Faksimile Verlag – part 10
- Flemish, Burgundian, and Biblical Art: the Story of Faksimile Verlag – part 11
- Middle Ages through the Manuscripts: the Story of Faksimile Verlag – part 12
- The Challenges of Gothic Art: the Story of Faksimile Verlag – part 13
- Ottonian and Charlemagne’s Art: the Story of Faksimile Verlag – part 14
Subscribe to Our Newsletter


